I’m a Cricut Blogger. The opinions and text are all mine.
This post contains affiliate links, meaning that when you click on a link that we recommend, we may receive a teeny weeny commission if you purchase a product.
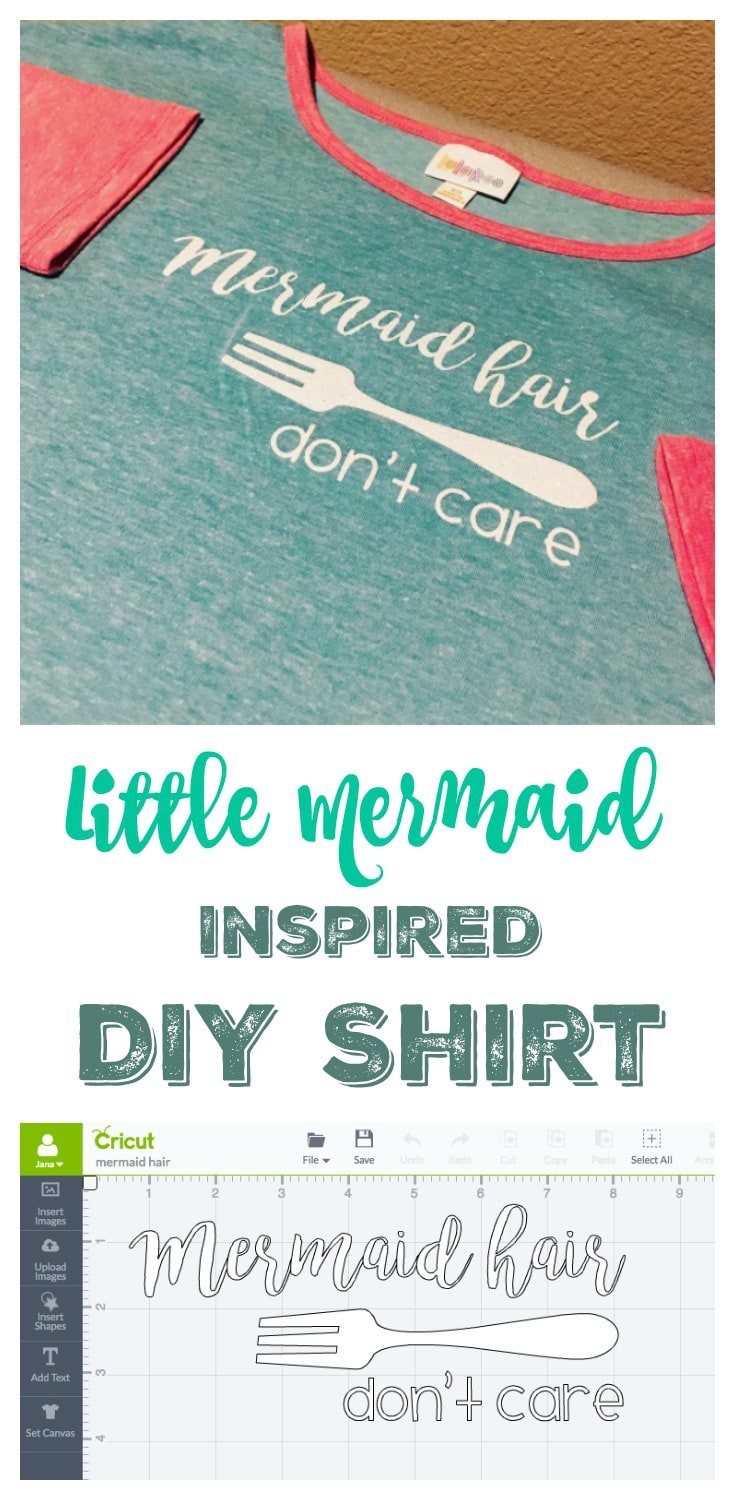
DIY Little Mermaid-Inspired Shirt
Directions
- Create your text in the Cricut Design Space.

- Use the letter spacing to adjust the space of the letters (kerning in graphic design) to bring the letters closer together to eliminate the gap for scripted fonts.
- Place Cricut Glitter Iron On onto Cricut Cutting Mat.
- Once your design is finished and ready to cut, load Cutting Mat into Cricut Explore Air as directed by machine.
- Send design (reversed for iron on) to Cricut Explore Air and watch it cut.
- Remove excess vinyl from backing using the weeder for fine lettering detail.
- Apply Cricut Glitter Iron On following directions on packaging.


https://www.instagram.com/p/BP_-ZwGgeM-/?taken-by=whiskynsunshine
Jana Seitzer is a writer, traveler, podcaster, and geek. Although well-versed in many fictional universes, Star Wars & Marvel have always been her favorites.
Latest posts by Jana (see all)
- SEND HELP is a Campy, Wild, Dark Ride - January 29, 2026
- Mental Health Treatment Is Getting More Personal and That Is a Good Thing - January 29, 2026
- The New Language of Addiction Care, Where Design, Dignity, and Depth Matter - January 24, 2026


I would have to say, Inside Out, Frozen or Mary Poppins…I just can’t decide!
Up made me so emotional and Inside Out too, love those! I also love Walle and the classic Little Mermaid!
I love this shirt…It totally fits my style-wash-n-go! lol